Learn how to make a homemade semolina roll from scratch. Made with 100% semolina flour and 5 pantry staples, these rolls are crispy on the outside, soft on the inside, and topped with a three-seed blend. Best of all, they go from bowl to table in 2 hours—perfect for subs, sandwiches, or dipping.
This post may contain affiliate links. Read our disclosure policy.
“Without bread all is misery” as William Cobbett once said (one of my favorite bread quotes and sayings). But for us with Mediterranean souls, life without semolina is true misery. From couscous and pasta to fresh, warm Mlewi, Harcha, and Mafaldine Siciliane, semolina flour is one of the cornerstones in our diet—particularly in North Africa and Southern Italy.
If you know me, you know my obsession with this golden grain. Over the years, I have baked with semolina thousands of times, perfecting everything from crusty semolina baguette to semolina buns, along with other favorites like semolina sandwich bread, ciabatta, and focaccia.
But today, I’ll teach you how to make the perfect semolina bread rolls. These homemade rolls are soft, chewy, and crispy, boasting a gorgeous, naturally pale-gold hue. Best of all, they use simple, 6 basic bread ingredients, and their semolina dough can even be prepared ahead of time.

What is a Semolina Roll?
As the name suggests, a semolina roll is made primarily from durum wheat flour, rather than the common all-purpose flour or bread flour used in hoagie rolls or the Italian herb and cheese bread. If you’ve ever baked with semolina, you know that this golden flour gives the rolls a signature pale-golden color, a rich, nutty flavor, and creates a distinct crumb structure that tends to be more tender and delicate than that of white bread.
Why You’ll Love These Semolina Rolls
- No fillers or white flour—just pure, golden durum wheat for the most authentic flavor.
- Ready in 2 hours
- Rustic, crispy crust with tender, soft crumb
- Naturally vegan
- make ahead & freeze friendly
Ingredients You Will Need
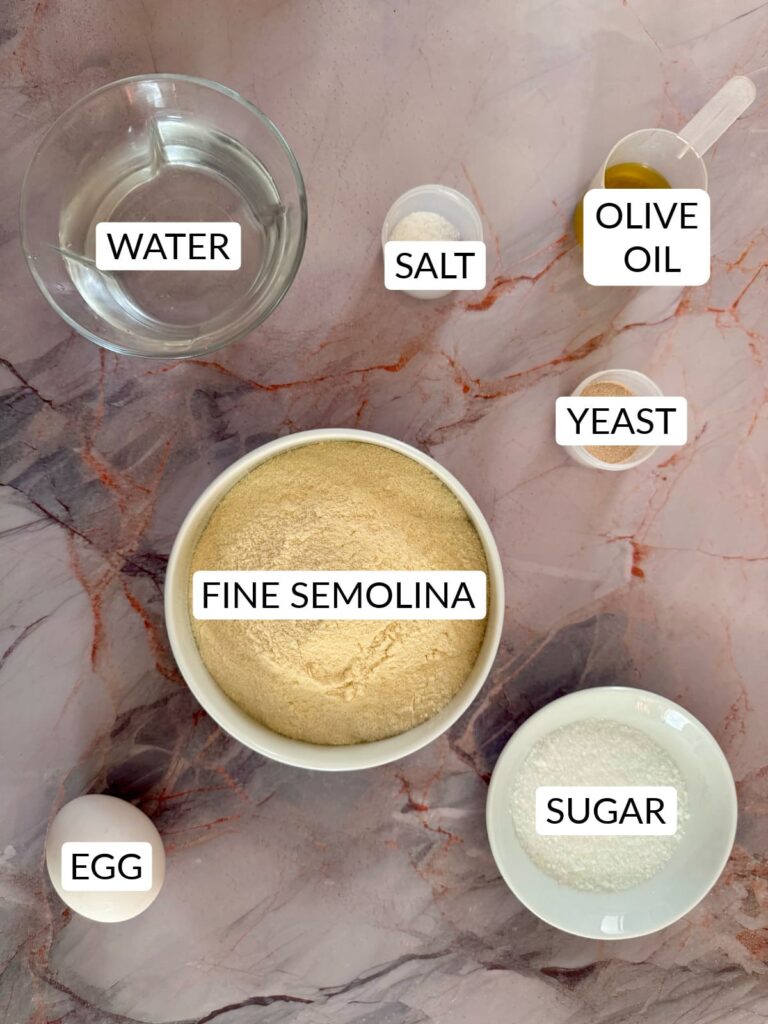
For this seeded semolina roll recipe, you’ll need fine semolina flour—avoid medium or coarse varieties. If you’re new to this ingredient, my guide on what semolina is covers everything you need to know about how to use, bake, and store it. Here are the rest of the essential ingredients you’ll need:
- Water: You’ll need warm water, to about 110°F (43°C), to activate the yeast and bring all the ingredients together.
- Sugar: Sugar feeds the yeast, adds a sweetness, and helps the rolls develop that gorgeous, golden crust.
- Yeast: I use instant dry yeast in this recipe, but you can easily substitute active dry yeast or fresh yeast. If you’re using active yeast, keep in mind the rise time will be slightly longer. If you’re using fresh yeast , you will need to triple the quantity by weight.
- Salt: Pick a coarse Mediterranean sea salt to stay true to the recipe’s origins.
- Olive oil: While you can use vegetable oil or butter as a substitute, using extra virgin olive oil, as I do, takes these semolina rolls to another level of flavor.
You’ll also need 3 tablespoons of a fennel, black sesame, and white sesame blend. You can sprinkle these on top right before baking, or mix them directly into the dough with the dry ingredients if you want.
Step-by-Step: How to Make Semolina Rolls Recipe
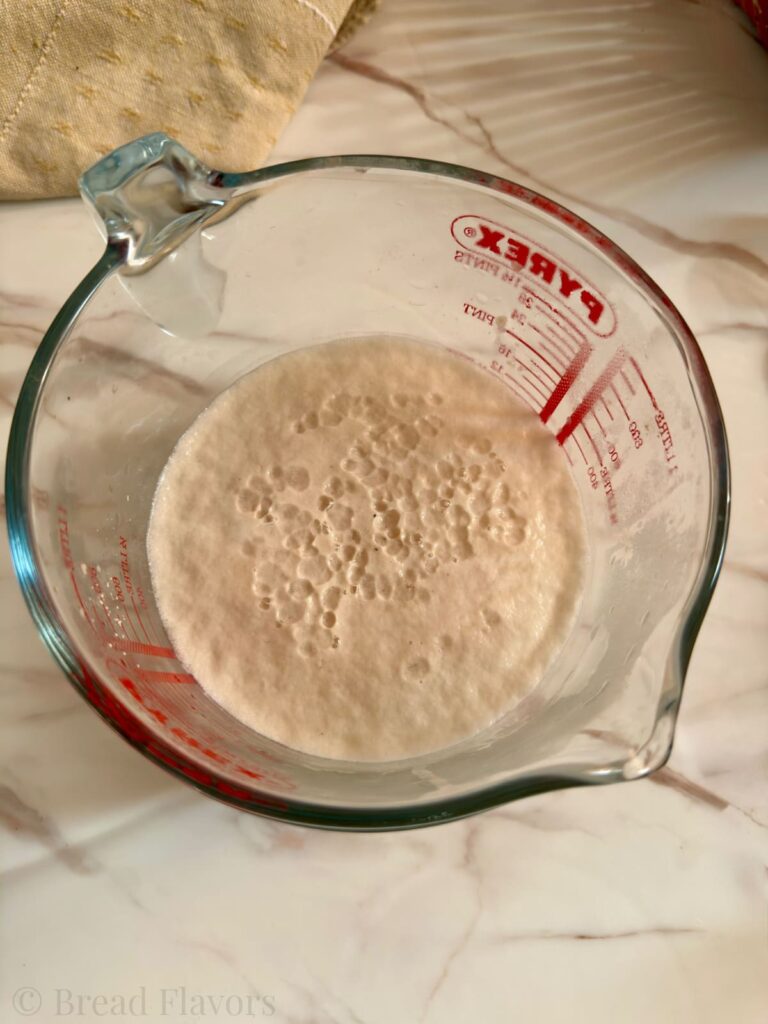
Start by proofing your yeast with the warmed water and sugar. After 10 to 15 minutes, the yeast mixture should become foamy and bubbly on top. If the water remains clear, flat, or just looks cloudy after 15 minutes, your yeast is likely dead or expired. To avoid any issues, always check your water temperature with an instant-read thermometer if you have one; it should be around 40°C-43°C (105°F–110°F).
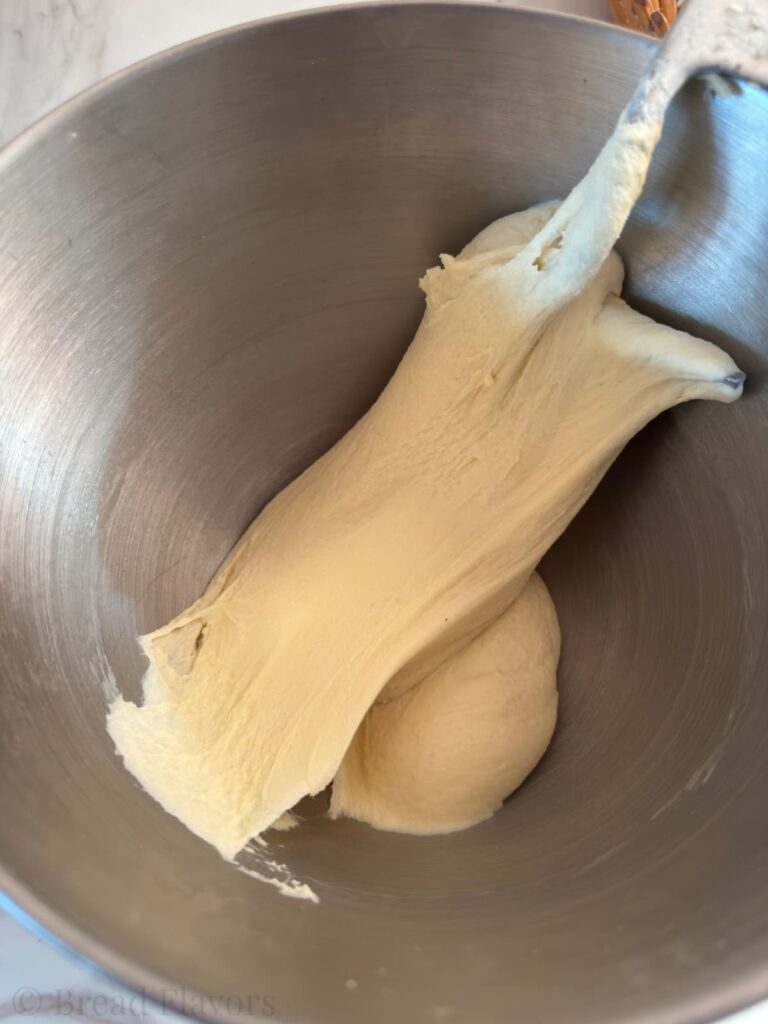
Add the remaining ingredients (semolina, salt, and olive oil) and combine with a dough hook or in a mixing bowl with a silicone spatula or dough whisk. Next, knead the dough for a full 8 minutes on medium speed or by hand on a surface lightly dusted with semolina until the dough is smooth, supple, and very tacky but not sticky. After kneading the dough thoroughly, cover it and let rest for 10-20 minutes.
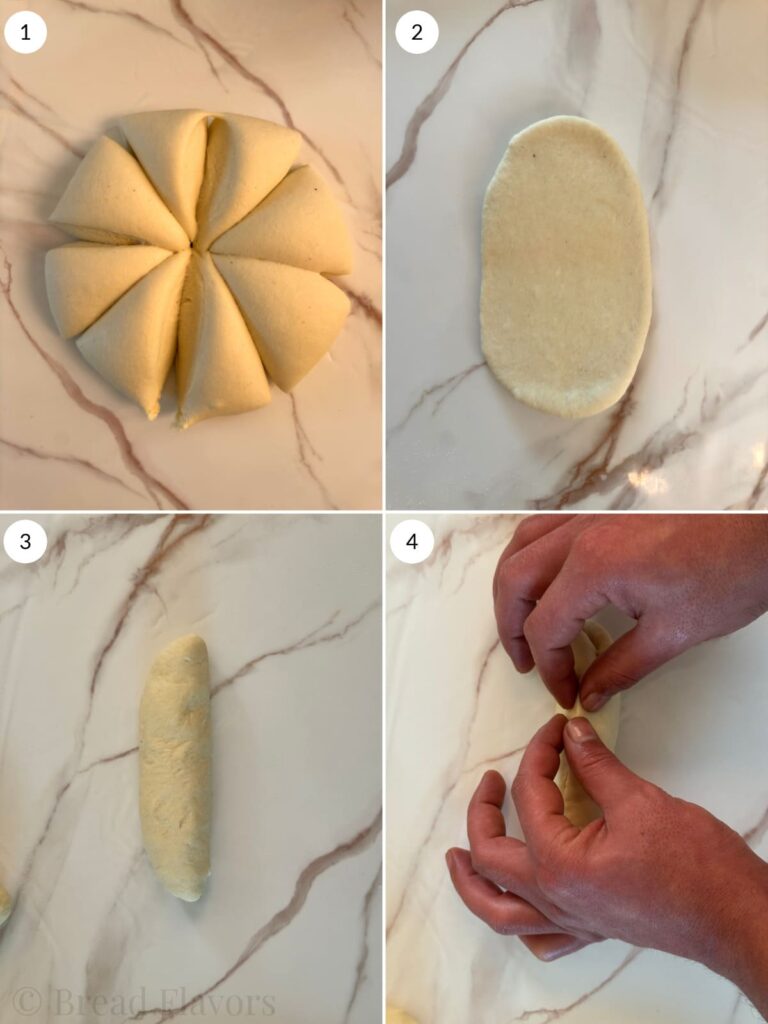
Using a bench scraper or a sharp knife, divide the dough into 8 equal pieces. To ensure your rolls bake evenly, use a kitchen scale to weigh your rolls before shaping, each weighing approximately 100-105 grams. Flatten each piece into a 4×6-inch (10x15cm) rectangle using your hands or a rolling pin. Then, roll up tightly into a 6-inch (15cm) log. Make sure to pinch the seam firmly.
Place the shaped rolls in a prepared baguette pan or on a half-sheet baking pan. I highly recommend using a baguette pan, as it ensures a perfectly rounded shape and a more even, crispy crust. I love using this baguette pan. It’s the same one I use for my bolillos and Vietnamese baguettes.
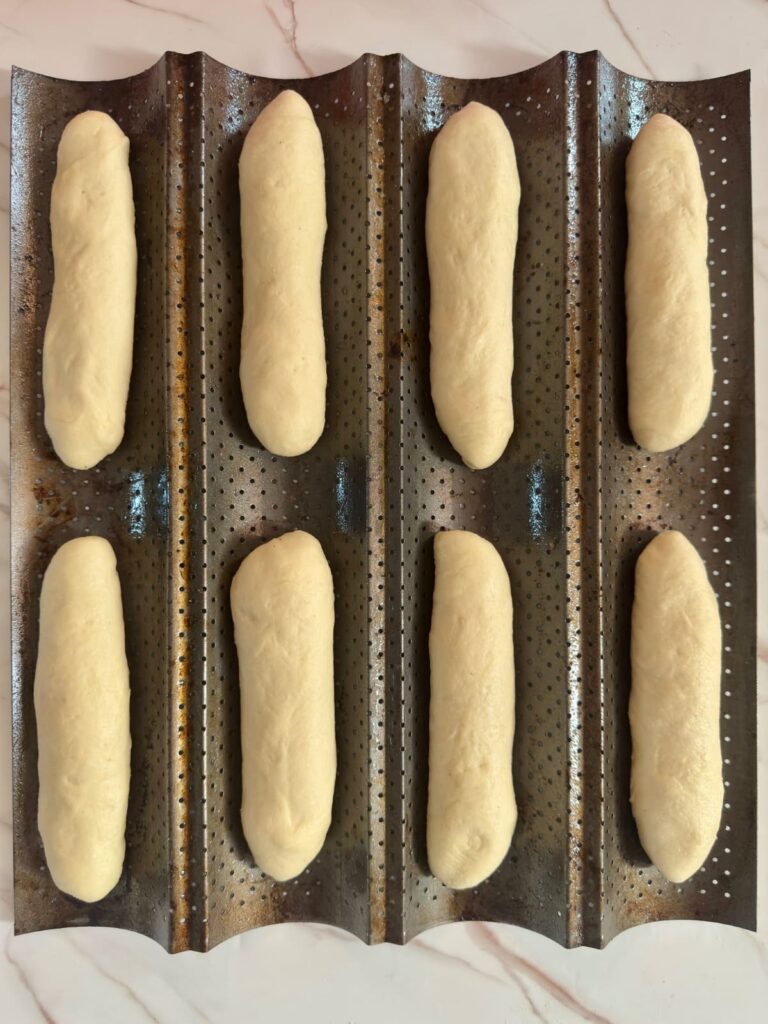
Cover the rolled semolina rolls with a clean kitchen towel and let rise in a warm environment until they are about doubled in size, about 1 to 1.5 hours.
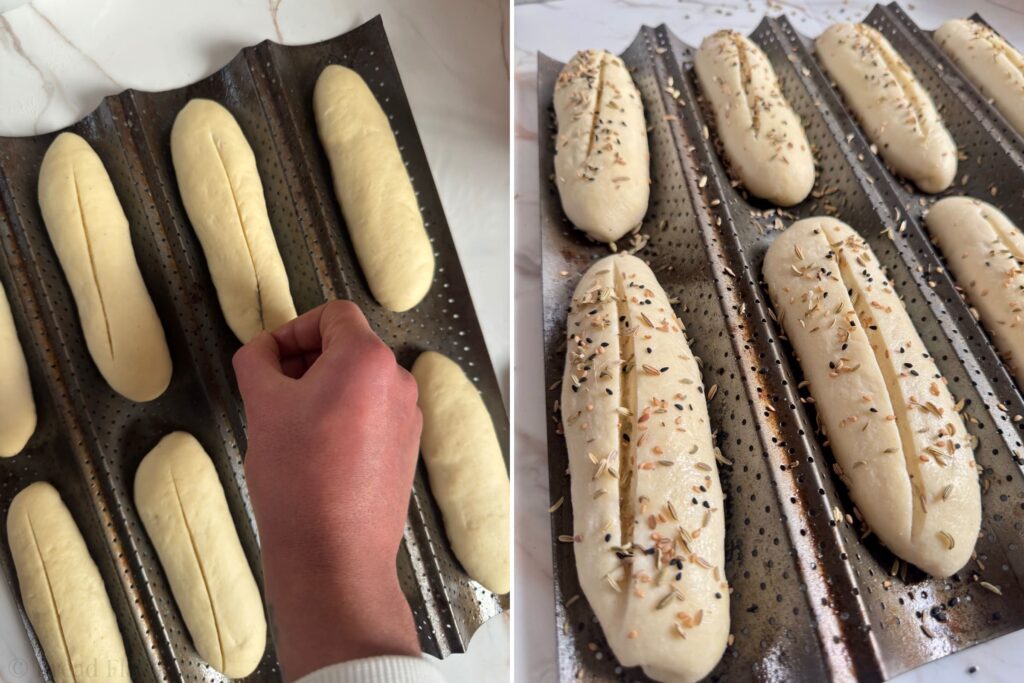
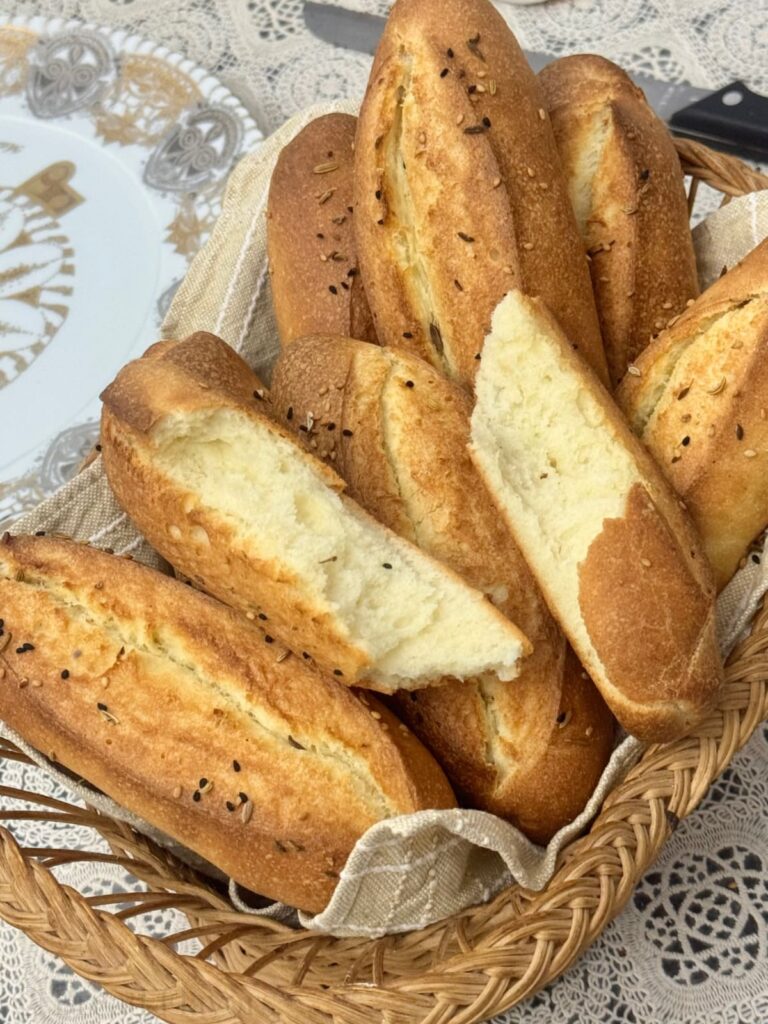
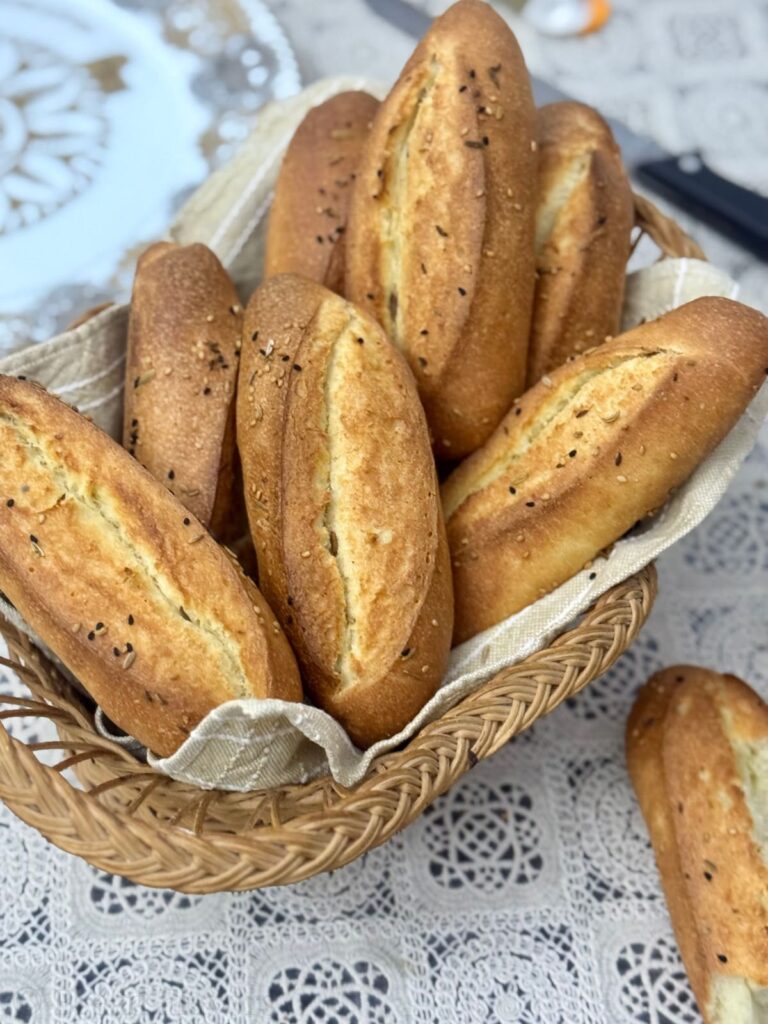
Spray the risen rolls with water. Score the rolls with a quick, 1/2-inch deep, vertical mark down the center, then sprinkle with sesame seeds, fennel seeds, and black sesame seeds.
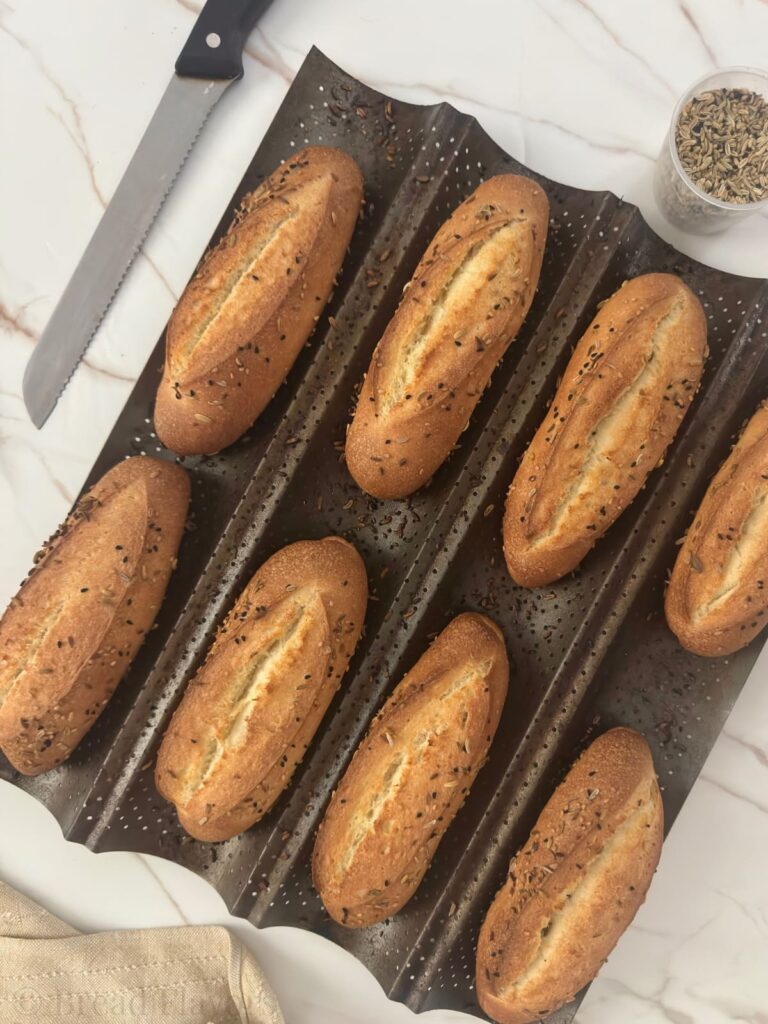
Immediately bake in a preheated oven until they have a beautiful golden color. The semolina bread rolls are ready when they sound hollow when tapped on the bottom.
3 Success Tips
- Use a kitchen scale to measure by weight, rather than by volume. Measuring your semolina in grams is the only way to ensure the hydration is perfect every time—it’s much more reliable than using cups, which can vary depending on the size of the measuring cups.
- Check your yeast first. Even with instant yeast, it’s worth a 10-minute wait to see that foam and bubbles, rather than working on dough that won’t rise.
- Use a baguette pan rather than a flat baking sheet to ensure your semolina rolls stay perfectly round and tall.
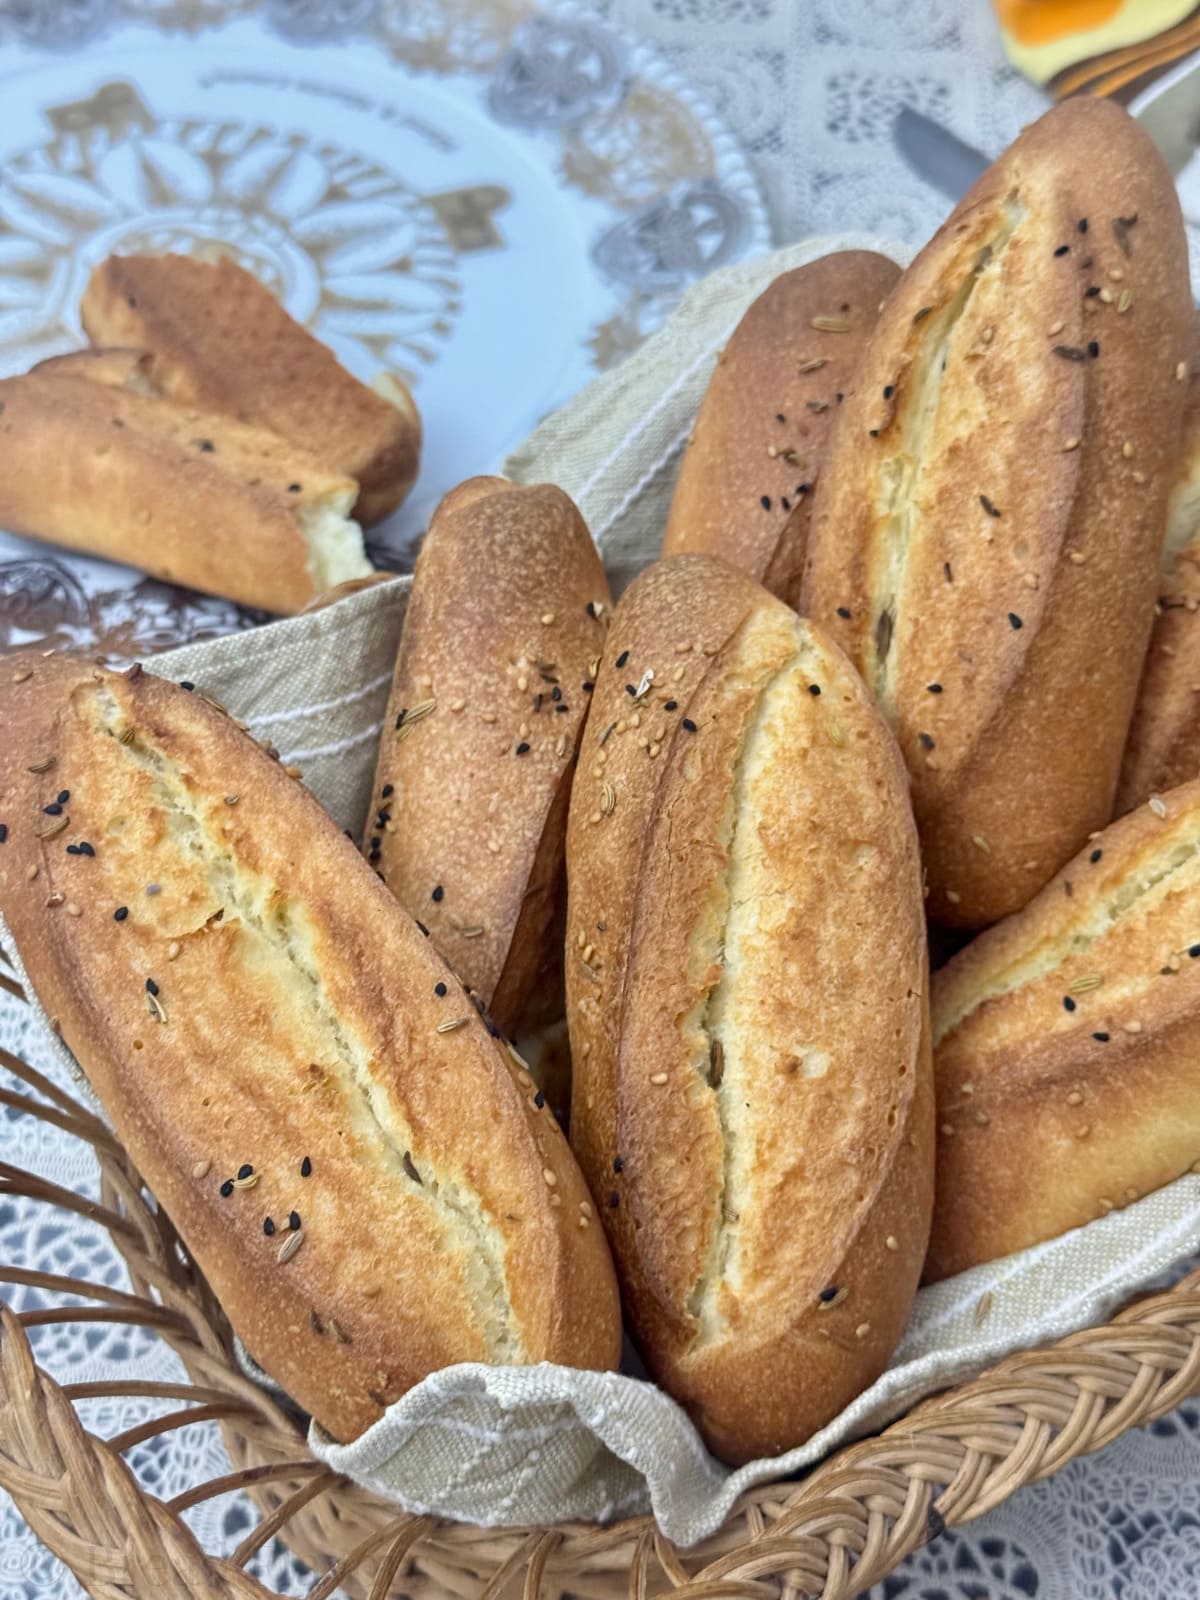
My last piece of advice? Don’t limit these rolls to a Mediterranean supper table. They are perfect for any meal, at any time of day. Enjoy them in the morning for dipping in olive oil, or use them to soak up your favorite pasta sauce and savory soups. Their sturdy, crispy crust makes them even better for Italian sandwiches, Philly cheesesteaks, and meatball subs than a standard soft roll, as they won’t get soggy under your favorite deli meats and toppings.
FAQs
What is the difference between these semolina bread rolls and hoagie rolls?
Aside from being made from different flours, these semolina rolls have a very crispy outside and a tender, soft inside. In contrast, my hoagie rolls have a chewy, pillowy texture with a much more delicate crust.
Is semolina gluten-free?
No, semolina is not gluten-free. It actually contains a higher gluten content than all-purpose flour.
Made this recipe? Share your baking adventure and let me know how it turn by leaving a ★★★★★ star rating and a review below. Be sure to follow me on Pinterest, Facebook, YouTube, and Instagram, and don’t forget to subscribe to my free newsletter!
Easy 100% Semolina Rolls
Ingredients
Dough
- 1 cup and 2 tbsp (285 g/ml) water, warmed to about 110°F (43°C)
- 2 and ¼ teaspoons (7 grams) instant yeast
- 1 and ½ tablespoons (18 grams) white sugar
- 3 cups (480 grams) fine semolina flour, plus more as needed
- 1 and ½ teaspoons (9 grams) coarse sea salt
- 2 tablespoons (30 grams) olive oil
toppings
- 1 teaspoons sesame seeds
- 1 teaspoons fennel seeds
- 1 teaspoon black sesame seeds
Instructions
- Prepare the dough: In the bowl of a stand mixer or a large mixing bowl, whisk together the warm water, sugar, and yeast. Cover and let it sit for 10-15 minutes until foamy and bubbly on the top.
- Add the semolina flour, olive oil, and salt to the bowl. Using a dough hook, combine on low speed for about 4 minutes until the dough forms a shaggy mass. Be sure to scrape down the sides and bottom of the bowl with a spatula to ensure all the flour is fully incorporated. The dough should clear the sides of the bowl and cling to the hook at the end of this step. *If you don't own an stand mixer? You can combine all the ingredients in a large mixing bowl with a silicone spatula, wooden spoon, or dough whisk until a shaggy dough forms.
- Knead the dough: Increase the mixer speed to medium and knead for 8 minutes until the dough is smooth and elastic, or transfer the dough to a lightly surface dusted with semolina and knead for 8 minutes. If the dough is too wet, add 1 tablespoon of semolina at a time; if the dough is too dry, add 1 teaspoon of water. Avoid over-adding too much flour or liquid, as you don't need a sticky or dry dough. The dough should be tacky but not stick to fingers after the kneading process (Refer to the photo in the above post as a guide). Shape the dough into a ball and place it in a lightly greased bowl. Cover with plastic wrap or a clean kitchen towel and let it rest for 10-20 minutes.
- Lightly grease a 13×15-inch baguette pan or a large baking sheet, or line with parchment paper.
- Shape the Rolls: Transfer the dough to a lightly floured surface and divide it into 8 equal pieces (about 3.5 oz or 100g each). Using a rolling pin, flatten each piece into a 4×6 inch (10×15 cm) rectangle. Starting from the long edge, roll the dough up into a 6-inch log, then pinch the seam firmly to seal. Place the shaped rolls in the prepared pan.
- Rise: Cover the shaped rolls with a clean kitchen towel or plastic wrap and let them rise in a warm environment for 1 to 1.5 hours until doubled in size. To ensure your semolina rolls are ready to: gently press a finger about 1/2 inch (1 cm) into the side of the dough—if the indentation slowly springs back halfway, they are perfectly proofed and ready to bake.
- Preheat the oven to 425°F (220°C).
- Lightly spray the risen rolls with water. Using a bread lame or sharp knife, score the top of each roll with a quick, 1/2-inch deep vertical mark down the center and generously sprinkle with the fennel and sesame seed mixture. Bake at 425°F (220°C) for 15–16 minutes until the rolls are a beautiful golden brown. Allow the semolina rolls to cool on the pan for 10 minutes before slicing and serving.
- Slice them for subs, dip them in sauces, or use them however you like. Cover leftover semolina rolls tightly and store at room temperature for up to 2 days, in the refrigerator for up to 5 days, or in the freezer for up to 3 months.